Popular post widget is one of the most used widget in blogger, but the default version of the popular post is not really cool. So, we have to customize the look of the popular posts. The blogosphere may already have quite a number of post on customizing the popular post widget.
What makes this post different is, I will update it in future when each time I create a new popular post widget. Each one will be my unique creation.
Table of contents
Adding Popular Post widget on your blog
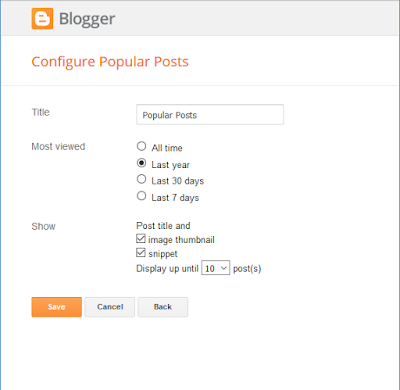
If you haven't already added the popular post widget, follow the below steps to add it.- To add the popular post widget go to layout tab click add a gadget on where you want to how the popular post widget.
- Configure the popular post widget as per your need.
- Now click save button.
Customizing the Popular Post
- On the Blogger Dashboard Go to Template > Edit HTML Button
- Click inside the HTML Editor, Press CTRL+F (This will open a search form on the top right side of the HTML Editor)
- Now search for
</head> - Above that place any one of the following popular post widget code.
- Now save your template. That's All. ;)
Ozura Style Popular Post Widget

Code:-
<style type="text/css">
/***** Popular Post *****/
.popular-posts ul { counter-reset: popcount; margin: 0 !important; padding: 0 !important; }
.popular-posts ul li { height: 160px; max-width: 300px; list-style: none !important; margin: 0 0 10px !important; overflow: hidden; padding: 0 !important; position: relative; border: 0; }
.PopularPosts .item-thumbnail { margin: 0; }
.PopularPosts ul li img { display: block; float: left; padding: 0; width: 300px; height: 160px; }
.PopularPosts .item-title { bottom:0; left: 0; right: 0; padding-bottom: 0; position: absolute; z-index: 999; }
.PopularPosts .item-title a { background: rgba(51, 51, 51, 0.6); color: #fff; display: block; font-size: 16px; line-height: normal; padding: 20px; text-transform: capitalize; }
.popular-posts ul li:hover .item-title a { color: #FFF; }
.popular-posts ul li:before { color: #fff; content: counter(popcount, decimal); counter-increment: popcount; float: left; list-style-type: none; padding: 5px 12px; position: absolute; text-shadow: 1px 1px #000, 1px 1px #000; top: 0; }
</style>

<script src='http://ajax.googleapis.com/ajax/libs/jquery/2.0.3/jquery.min.js' type='text/javascript'/>
<script type='text/javascript'>
/*<![CDATA[*/
//Popular Post img resize script
$(document).ready(function(){$(".popular-posts li .item-thumbnail a img",$(this)).each(function(){var src=$(this).attr("src").replace('/s72-c/','/s0-c/');$(this).attr("src",src)})});
/*]]>*/
</script>
Note:- If your blog already has jquery installed, Remove the highlighted part in the above code.
BTNT Style Popular Post Widget

Code:-
<style type="text/css">
/***** Popular Post *****/
.PopularPosts .widget-content { background: #f2f2f2; border: 1px solid #e3e3e3; }
.PopularPosts h5 { background: #8C8C8C; color: #FFFFFF !important; padding: 12px 24px !important; margin: -1px -1px 0; }
.PopularPosts .widget-content { font-size: 15px; margin: 0 !important; }
.popular-posts ul { margin: 0 !important; padding: 0 !important; }
.popular-posts ul li { list-style: none; border-bottom: 1px solid #ccc; border-top: 1px solid #FFFFFF; padding: 0 !important; }
.popular-posts ul li:first-child  { border-top: 0; }
.popular-posts ul li:last-child  { border-bottom: 0; }
.popular-posts ul li:hover { background: #fafafa; text-decoration: none; }
.popular-posts ul li a { color: #404040; display: block; padding: 18px 24px; }
.popular-posts ul li a:hover { color: #262626; text-decoration: none; }
.popular-posts ul li .item-snippet { padding: 0 24px 18px; }
.PopularPosts img { background: #fff; border: 1px solid #CCCCCC; display: block; float: left; height: 48px; margin-right: 8px; padding: 3px; width: 48px; -webkit-border-radius: 50px; -moz-border-radius: 50px; border-radius: 50px; }
</style>
Ravia Style Popular Post Widget

Code:-
<style type="text/css">
/***** Popular Post *****/
.PopularPosts h5 { background: #5E6472; color: #FFFFFF !important; padding: 12px 24px !important; text-align: center !important; -mox-border-radius: 5px 5px 0 0; -webkit-border-radius: 5px 5px 0 0; border-radius: 5px 5px 0 0; }
.PopularPosts .widget-content { background: #FFFFFF; -mox-border-radius: 0 0 5px 5px; -webkit-border-radius: 0 0 5px 5px; border-radius: 0 0 5px 5px; box-shadow: 0 0 2px rgba(0, 0, 0, 0.1); overflow: hidden; font-size: 15px; margin: 0 !important; }
.popular-posts ul { margin: 0 !important; padding: 0 !important; }
.popular-posts ul li { list-style: none; border-bottom: 1px solid #F1F4F9; padding: 18px 24px !important; font-style: italic; color: #aaa; }
.popular-posts ul li a { font-style: normal; }
.popular-posts ul li { list-style: none; border-left: 5px solid #f9f9f9; }
.popular-posts ul li:last-child  { border-bottom: 0; }
.popular-posts ul li:hover { border-left: 5px solid #5E6472; text-decoration: none; }
.PopularPosts .item-thumbnail img { height: 60px; margin-right: 8px; padding: 3px; width: 60px; -mox-border-radius: 50px; -webkit-border-radius: 50px; border-radius: 50px; }
</style>
Like these widgets consider sharing it with your friends, also share your thoughts in the comments section below.
Thank you... ;)


Hi Chandeep,
ReplyDeleteThanks for sharing these awesome widgets. Glad to have you back on BTNT! :D
Regards,
Vinay
Thanks buddy :D
Deletewah cool tips
ReplyDeleteThanks mate.
DeleteHey,
ReplyDeleteAmazing post chandeep.
Thanks for sharing this :)
My pleasure bro, Thank you.
DeleteTanx, Chandeep for the trick. Thump up.
ReplyDelete